1. Opening: why you need this tool
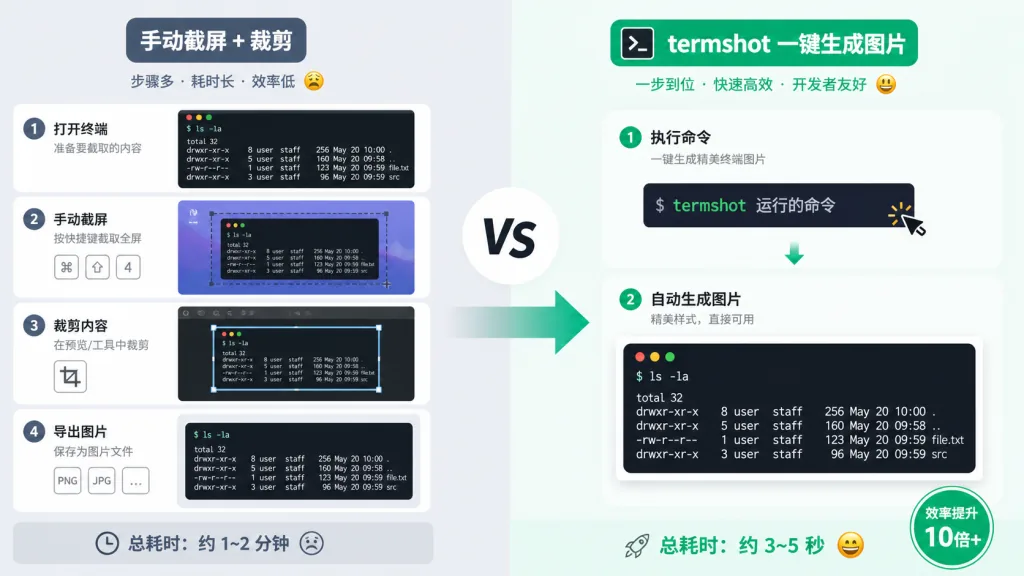
You just ran a beautiful ls -la in your terminal and want to share it with a colleague, but the only option is to screenshot it, crop it, then paste it into a group chat. The screenshot always comes with window borders and messy backgrounds, and sometimes it accidentally leaks sensitive information. Worse, you try an online tool like Carbon, but that means copy-pasting, uploading, and worrying about privacy — the whole thing wastes at least 30 seconds. Do that every time you share something and you've burned hours over a year.
A Go tool that runs locally solves this: run the command, get a high-fidelity screenshot you can use immediately. No internet, no cropping, no manual adjustments.
2. Project intro: what it is in one sentence
termshot is a command-line tool written in Go that captures a terminal command's output (ANSI colors and styling included) and renders it as a PNG screenshot with window decorations.
Core traits: local (no network), high fidelity (all ANSI formatting preserved), customizable (window style, margins, column width), and it supports pipes and editing.
It currently has 959 GitHub stars, version 0.2.5, is licensed under Apache-2.0, and is maintained by the homeport team.
3. Core features in depth
1. Run a command and screenshot it
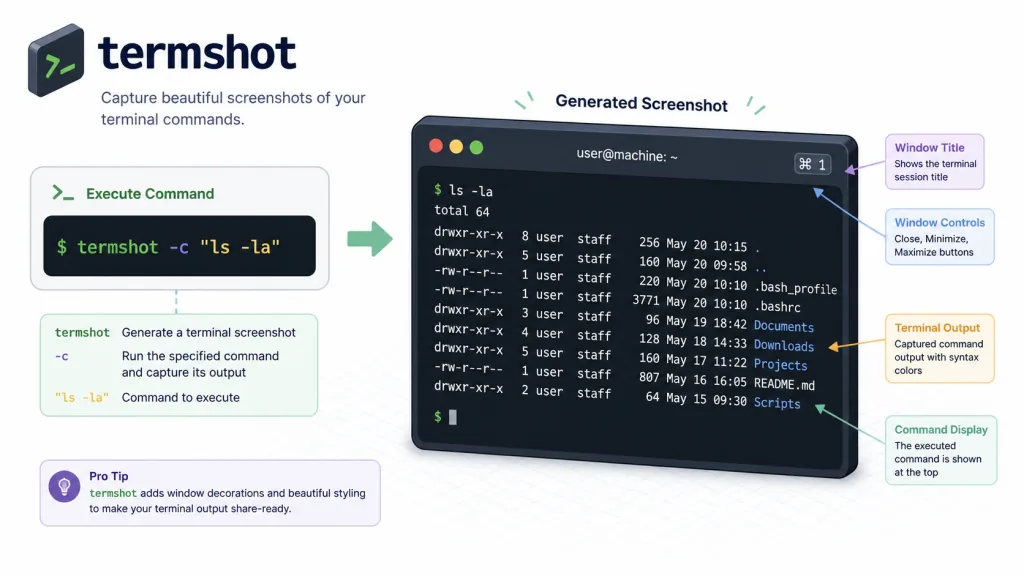
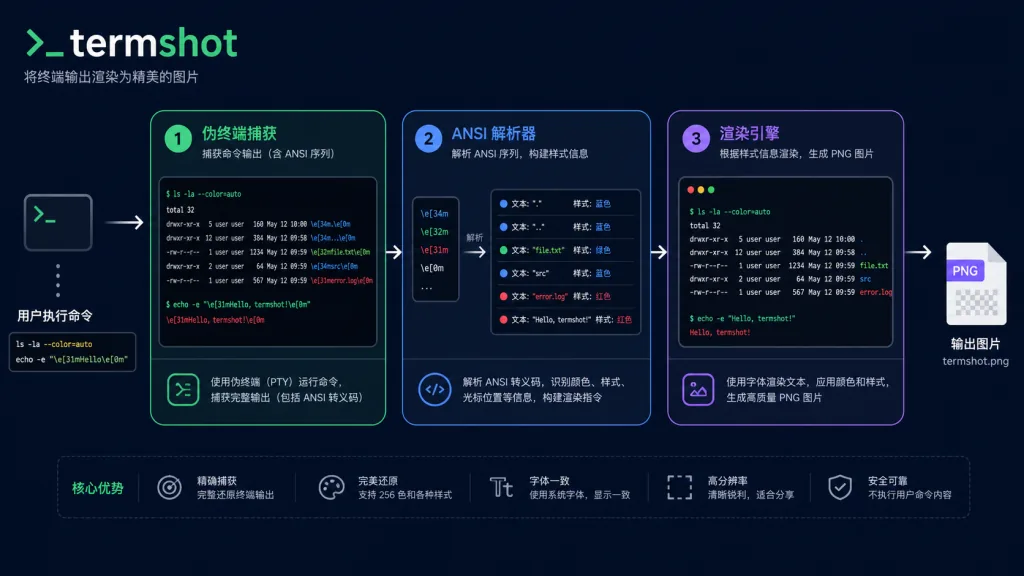
The most common usage: termshot ls -a produces out.png in the current directory. termshot executes the command in a pseudo-terminal, captures all output, then renders it as an image.
termshot -c "ls -la" # -c shows the command itself
Compared with a traditional screenshot: you don't have to select a region or resize a window, and the output adapts to the content automatically.
2. Pipes and complex commands
When a command contains | or >, wrap the whole command in double quotes to remove ambiguity:
termshot -- "ls -1 | grep go"
That's far more convenient than Carbon: no copy-paste, just a screenshot.
3. Edit the output (--edit)
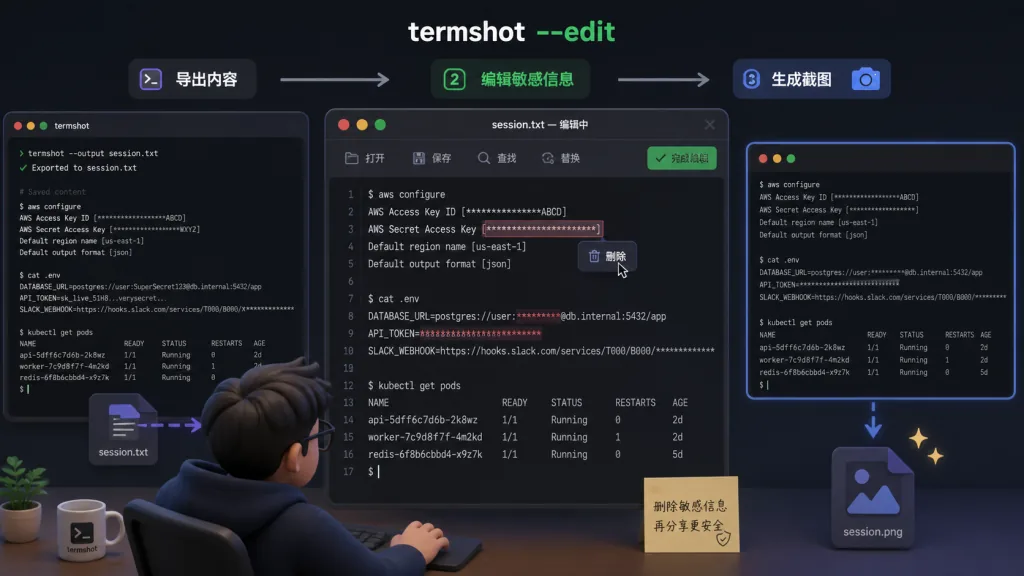
Before rendering, termshot opens $EDITOR so you can edit the raw output (delete a password or a URL, for example). Save your changes and the screenshot is generated from the edited version.
4. Customize the appearance
--show-cmd: show the executed command at the top of the screenshot.--columns: force a column width so long output wraps properly.--marginand--padding: adjust the whitespace around the window.--no-decoration/--no-shadow: drop window decorations or shadows — handy for embedding in docs.
These options cover different contexts: blog posts want something clean, while social media may want a full screenshot with the command visible.
5. Output to clipboard (--clipboard)
On supported platforms you can send the screenshot straight to the clipboard, skipping the save-then-paste step.
6. Read a raw file (--raw-read)
If you already have a text file containing ANSI output, --raw-read renders it directly and skips command execution.
4. Technical highlights and performance
The core innovation in termshot is pseudo-terminal capture plus an ANSI parser. It creates a pseudo-terminal to execute the command, which yields the full set of terminal control sequences. It then parses those sequences (colors, bold, underline and so on), renders them to a pixel buffer in memory, and outputs a PNG.
- Performance: since it's compiled natively in Go, execution is fast — usually a screenshot within a second, depending on output length.
- Cross-platform: macOS and Linux (via Homebrew or a binary).
- Ecosystem compatibility: works with any command that emits ANSI colors (
ls --color=auto,git diff,fzf, and so on). - The edge: unlike online tools such as Carbon,
termshotis a standalone CLI that can be wired into CI/CD scripts and automated tests.
5. Use cases and audience
Who it's for
- Developers: writing blogs or docs that need terminal screenshots.
termshotproduces borderless, customizable images you can embed straight into Markdown. - Ops engineers: recording command output and sharing error logs, using
--editto scrub sensitive information quickly. - Technical bloggers and YouTubers: making tutorials with
--show-cmdto display commands and--no-decorationfor clean images. - Open source maintainers: showing command output in a README, e.g.
termshot lolcat -f <(figlet -f big termshot).
Who it's not for
- Users who need rich syntax highlighting (coloring by language keywords) —
termshotfaithfully reproduces terminal output and won't re-highlight the text. - Users who must stay on Windows — only Darwin and Linux binaries are available right now.
6. Comparison with alternatives
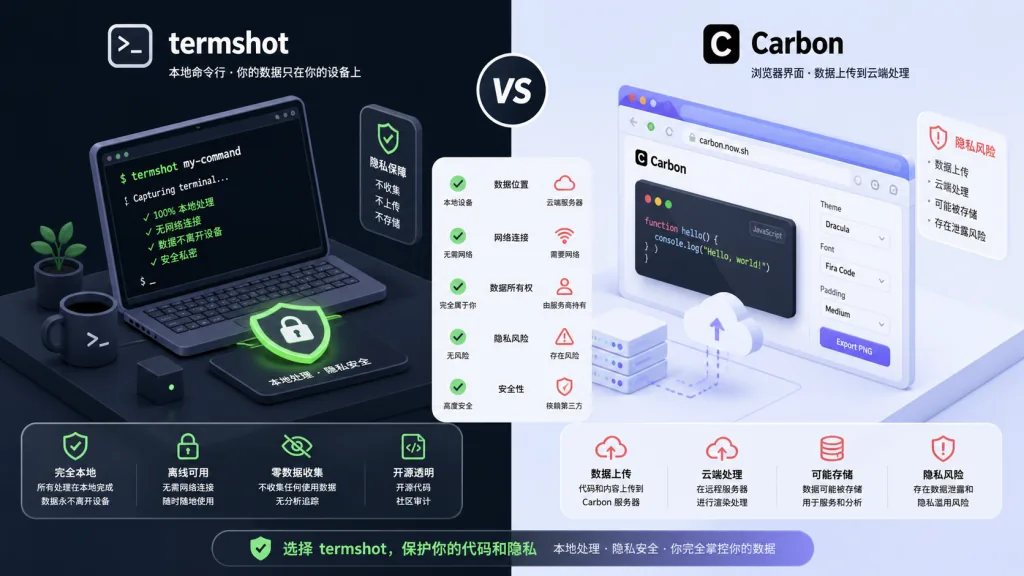
| Feature | termshot | Carbon | CodeKeep | Manual screenshot |
|---|---|---|---|---|
| How it runs | Local CLI | Browser | Browser | System tool |
| Needs network | No | Yes | Yes | No |
| Preserves ANSI colors | Perfectly | Manual paste | Manual paste | Tool-dependent |
| Pipe support | Native | No | No | No |
| Edit output | Supported | Manual | Manual | Edit after capture |
| Privacy | Fully local | Uploaded to server | Uploaded to server | Local |
| CI/CD integration | Yes | No | No | No |
Why termshot? If you share terminal output often and care about privacy and speed, termshot is the only local tool that generates a simulated terminal screenshot in one command. Carbon is better for showing a single line of code, but it can't handle complex ANSI output.
7. Getting started quickly
Install
macOS / Linux (Homebrew):
brew install homeport/tap/termshot
Other systems: download the binary for your platform from Releases and put it on your PATH.
Minimal example
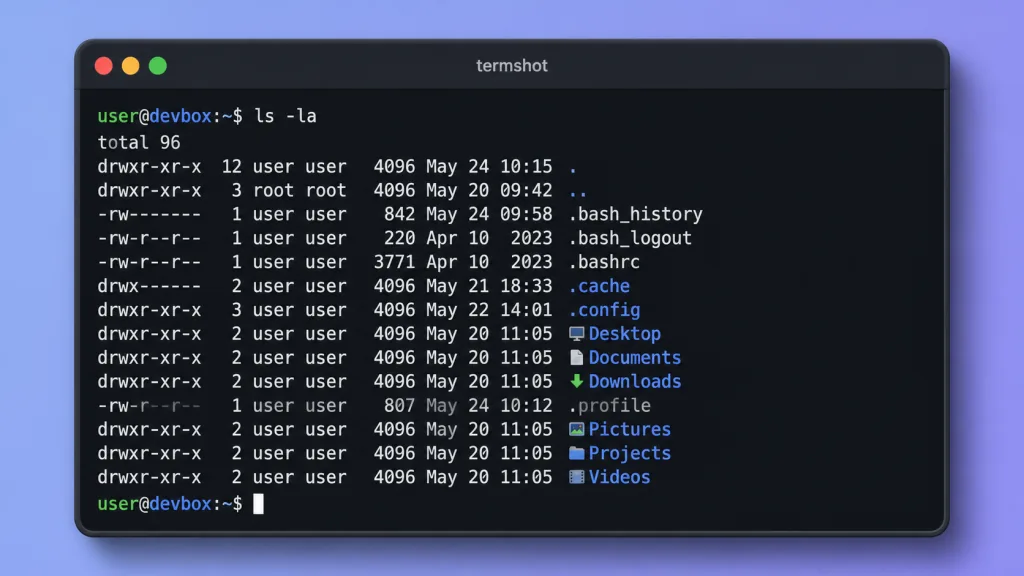
termshot ls -la
You'll find an out.png in the current directory. Open it:
Advanced tips
- Use
--filenameto pick the output path:termshot -f myimage.png -- "ls -a". - Combine with
--editto strip sensitive data:termshot -e -- "cat /etc/passwd". - Use it in scripts:
termshot -c --no-shadow -- "echo Hello", then upload straight to an image host.
8. Takeaways and next steps
termshot is a lightweight, high-performance tool that turns terminal output into a usable screenshot and kills the tedious screenshot-crop-upload loop. Its core value: local, fast, customizable, private.
What to do:
- Install it and try it now:
brew install homeport/tap/termshot. - Use
termshotinstead of manual screenshots in your blog or docs. - If you need screenshots in CI/CD, try
termshotwith--raw-read.
Project link: GitHub: homeport/termshot (959 stars, Go).
One-line pitch: terminal screenshots without opening a browser.